Monday, 7 January 2019

The Battle of Long Sault Revisited


(Photo by DougH.)

DougH kindly offered to host a game at his abode this last Friday, and since there was nothing definite on offer, I volunteered to bring in my 17th Century Iroquois versus New France collection: specifically, the 1660 Battle of Long Sault. Participants were JimF, PeterM, DougH, and myself.

This was a game I ran previously at Trumpeter's Salute 2017. (You can click here for the scenario description and details on how it ran on that occasion.)

Luck of the draw had Peter and Doug as the Iroquois, with Jim as poor Dollard,
leading his motley band of freebooters. Jim had to go it alone for most of the game, as I (who also ran the game) was tasked with marching to his relief with a company of Regulars.

In brief:

  • The Iroquois sprang the trap on Dollard's boys, catching most of them in the open.
  • Jim decided to put up a fight then and there -- which lead to the death of most, and the group's resident Jesuit taking to the deep, dark, and Iroquois infested wood with a  handful of followers. (End of game for the Holy Father, but maybe a good skirmish scenario using Jim's new Woodlands Indian collection?)
  • Jim's scattered remains make it back to the stockade, and manage to hold out thanks to an unreasonable amount of luck. Witness: multiple activation failures by Peter and Doug; an Iroquois band -- which made it through the still open gate -- being expelled; numerous unsuccessful assaults on the walls; etc., etc.
  • The Regulars finally march to Dollard's relief (Turn 17!). He and his last two remaining compatriots run to safety, abandoning their fort to the Iroquois -- who burn it out of spite.

So, victory to Jim (I can't claim any), but on reflection I think that the Iroquois were robbed!

Thanks to all, esp. to Doug, who helped supply the (better looking) photos, below.


 Dollard et. al. hold out in the stockade (photo by Doug).


An intruding warband overstay their welcome and are evicted (photo by Doug).


Ah! but Peter's Iroquois sneak 'round the back ...


The Regt. Carignan-Salieres arrive at last! 


The mighty stockade is left to the depredations of the irritated Iroquois.


Some of Peter's overly excited warriors.

Thursday, 25 October 2018

First Saratoga with 'Loose Files & American Scramble'

I recently got my hands on a copy of Andy Callan's AWI rules 'Loose Files & American Scramble', and since I had just gamed  DougH's War of 1812 modification of this rule set, I was motivated to try out the original.

I don't have my 28mm AWI collection ready yet (c. 400 unpainted figs!), so I decided to use my 6mm 1812 figs instead. I wasn't gaming out an 1812 battle, however; simply using 1812 figs to fight an AWI battle.

I've long thought about re-staging Saratoga since reading about it in the Peter Young's 1972 classic The Wargame: Ten Great Battles Recreated from History, (well, that book is how I first got into miniature gaming, really!). The scenario details were taken from Black Powder. The figures are all 6mm Irregulars. The playing area is 36" x 30" and fit nicely on my gaming table, with room to spare.

I won't boor you with the historical outline, which you can read about here.

As far as my solo game went; in brief: The British left (Hamilton's brigade, under 'Gentleman Johnny' Burgoyne) attacked the American line, pushing it back in spite of taking fearsome casualties inflicted by Morgan's Riflemen. Counterattacks by Poor's brigade, led by the American C-in-C on the day Arnold, recoiled the British. The great departure from the actual battle was the attack of the British right, under Gen. Fraser, which totally caved in the Americans under Learned. With the American flank turned Burgoyne resumed his attacks, and the Rebels were sent packing.

Below is some eye candy from the game. The rules use a lot of markers, and the ones I have are functional rather than aesthetically pleasing, which may offend the sensibilities of some (sorry, Doug!). That being said, they worked well.

Note: clicking on images to enlarge them helps a lot.


Burgoyne's left hits the American line, with rebels taking shelter in the woods.


Gentleman Johnny urges Hamilton's Brigade on.


An event from mid-battle: The 62nd Foot (Wiltshires) wait in reserve while the battle rages in front of them.


British Pickets defend Freeman's Farm. Note 'dead guy' marker.


The 2nd Mass. lie in wait.


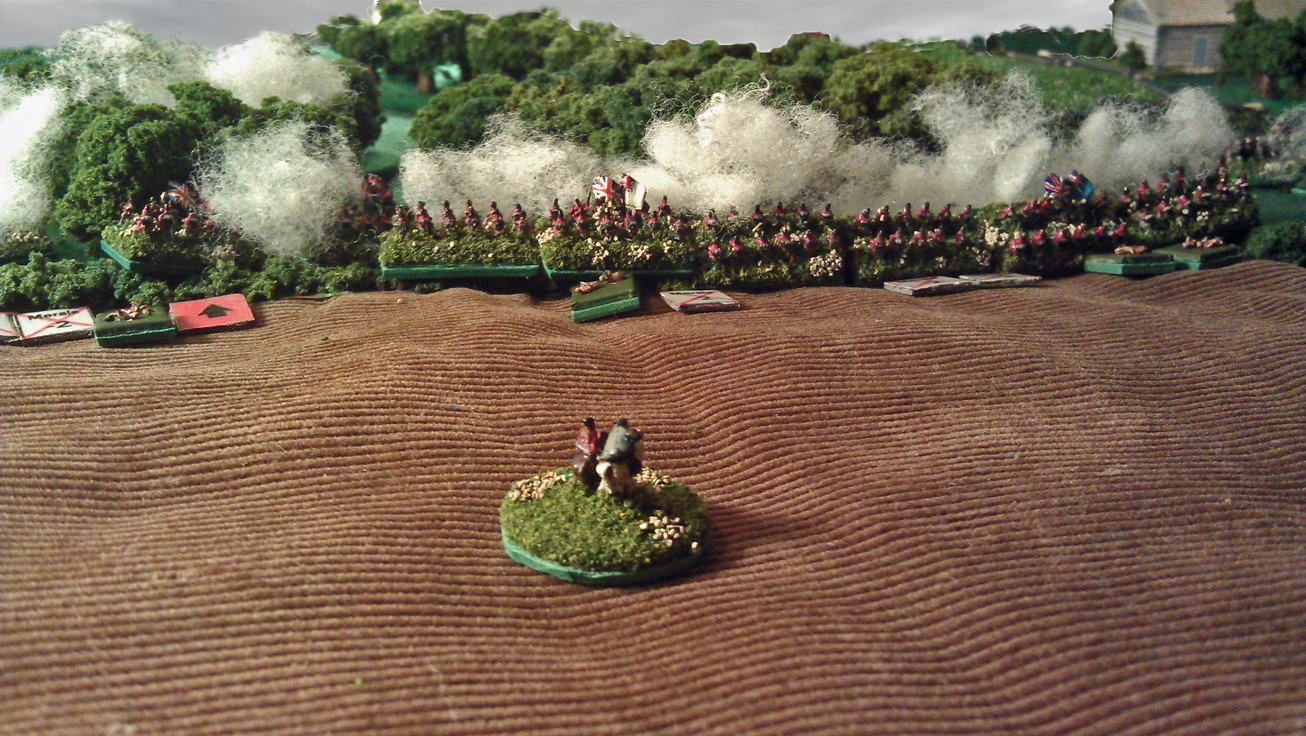
The 1st New Hampshire hit the 9th Foot (East Norfolk Regt.), so the Royal Artillery blast them in the flank.


Burgoyne desperately tries to rally the 20th Foot (East Devonshires), but the 'dead guy' markers pile up!


Relief comes to the British on their right, as Fraser's column moves up.


" 'oozah, the British Grenadiers!" as they turn the American left.


No help from these fellows, though. Fraser's native allies take shelter behind the western woods, and refuse to move for the rest of the battle. Fraser tried to motivate them with such encouragements as, "Get forward, you filthy devils! Miserable cowards!" to no avail.


Burgoyne renews his attacks. The 21st Foot (North British Fusiliers), right, are down to less than 70 men. The Americans, however, have fled.


The field at the end of play.

If it looks like most of these camera shots favour the British, it's simply because the American table edge was blocked off by the wall!

I liked the way the rules played. They flowed nicely, yet still had a natural and realistic feel to them --but you really have to keep on top of those markers. It seems to me that they might be better suited to either solo play or a small game with a couple of guys who know the rules. Not sure if they would work well as a multi-player game on a club night. Fun, though!

Commanders are really important, as their 'command points' control the action, rally troops, etc.

Leader casualties were heavy in this game, and that had a great effect on the outcome. British Gen. Hamilton was seriously wounded by a musket ball on turn one and out of the action, while the famous American leader Dan Morgan was killed by British pickets on the same turn (no more 'turkey calls' from him, and just before Thanksgiving, too). Gen. Poor was slightly wounded mid-game, which affected his command ability. Gentleman Johnny, himself, was also slightly wounded, and, on the last turn of the game, Benedict Arnold was blasted to pieces by a cannon ball (at 300 yards) while attempting rally fleeing troops!

I can always tell I had an enjoyable game when I get into the nitty-gritty of stats-taking at the end. Using my 40/30/30 percent ratio (KIA/seriously wounded/lightly wounded), the British suffered 740 (20% loses) KIA & seriously wounded (out of action for campaign purposes) while the Americans 1132 (32% loses). So, pretty much the reverse of the real thing.

Cheers.

Saturday, 6 October 2018

Battle of the Pyramids with 'Blucher' Rules #1

For a change of pace from 28mm I've switched back to the sanity of 2mm 'nano scale' gaming. ;-)

Some time ago I purchased a copy of Sam Mustafa's grand scale Napoleonic rules 'Blucher', but I haven't had a chance to try them out, yet.

I was thinking of doing something like Borodino or the joint battles of Quatres Bras/Ligny with my 2mm Napoleonics, but those battles seem too big for a first try of new rules.  The Battle of the Pyramids seems about right, substituting my 2mm Sudanese for the Mamluks.

Below are a few concept shots of the game; the actual thing would be more expansive.


The French in divisional square. Gen. Bonaparte -- on white horse -- takes refuge inside (yes, I know he actually rode a camel!).


Grand view of the Battle. Note Dhows on the Nile ("Mon Dieu and Death of a Life! There's dhowsands of them!").


The Fellahin surge forth.

A few notes on the Pyramids of Giza: My collection uses a ground scale of 166 yards to the inch for 'Blucher'. Given that, these model pyramids are accurately to scale, both in height and 'footprint'.  Just about all miniature gaming uses a compromise between figure scale and building scale when using buildings, and it's no exception here; my 2mm figs. would be -- at 166 yards to the inch -- about 40 feet high. If the same proportions were to be used with 28mm figs., the Great Pyramid of Khufu alone would be about two feet across.


Where's Sphinx. you ask? On the other side of the pyramid, of course!

Thursday, 4 October 2018

Great Northern War Project - Batch #6

Swedish Foot Guards


It's come to the attention of His Peace Loving Majesty Karl XII that the perfidious Saxons have joined with pagan Rus, taking up arms against Christian Sweden, beacon of light in the North.

There's nothing for it, then, but to raise more troops; in this case two units of Foot Guards:


The Guards parade in the Kungliga Slottet, Stockholm.


Will no one aid Sweden in it's Crusade? Gottorp-Holstein? Some Cossacks, maybe?

Saturday, 1 September 2018

Grendel


Here are some shots of a figure that I've had lying around for awhile: Grendel, whom I plan to add to my Dark Age collection in order to give it some supernatural flavour.


The massed might of the Scylding Host steps forth to do battle with 'God-cursed' Grendel, who has come 'greedily loping'. ("He's the son of Cain, don't ye know? And his mother is something of a witch, they say."


The massed might of the Scylding Host collectively decides that this wasn't such a good idea.  Definitely time to call 1-800-BEOWULF. 

Monday, 20 August 2018

Great Northern War Project - Batch #5

Swedish Command Figures


Completing my Swedes for this project are three Swedish command figures.  As always, the camera is very unkind, as I swear they look much better 'in the flesh'. But it is what it is.

Below is Colonel Wallander, whose command this is.

A Swedish General of Horse:


And for the pièce de résistance, Charles XII of Sweden, himself!


The above psychological study of Charles has him setting lose 'the lads' on a hapless Russian fusilier.  I'm not sure what to call this one: "Unleash the Hounds", "Let Slip the Dogs of War", or "Feet, Don't Fail Me Now!".


Charles' finger in the air could mean "Fear God!" or, "That's one!"


The sharp end of war.


Charles prefers his super-sized sword (courtesy of Wargames Factory). Hounds, I believe, are old Ral Partha, while cavalry below are Old Glory. Fusiler is a conversion. As I said, it is what it is.


Sunday, 5 August 2018

Great Northern War Project - Batch #4

Swedish Horse


This batch of Horse completes my Great Northern War Swedish Host for The Pikeman's Lament. Well, is an army ever complete? I still need to do some generals; and I could always use a few more Grenadiers; plus some terrain features; and what about Finnish Reindeer cavalry? But what I've got -- a little under 100 figs -- is sufficient unto the day.

I've painted up four units of six figs each -- three units of Vastgota Regt. 'Rytter' cavalry ('Gallopers'), and a single unit of  Bohuslans Dragoons. The later unit is all mounted, since sources agree that Swedish Dragoons were employed in exactly the same way as Rytters, and seldom if ever operated on foot. "Ga Pa!"


Close up shot of the Vastgota command element, warts and all.


Bohuslans Dragoon, in green coats. Just about the only native Swedish Dragoon Regt. in Chuck the Twelfth's army, since the rest were Germans, etc. They are fully mounted and ready for serious business -- no silly skirmishing from these lads!