Sunday 5 November 2017

Retreat from Mons, 1914


A rare, grainy film shot of advancing German infantry, 1914
 
Colin, Denis, and Jospeh were kind enough to endure my 'Retreat from Mons, 1914' game (using 6mm Irregular Miniatures) held at our local Trumpeter's Gaming Society meet-up on Friday night (Nov 3rd).
 
Here's the advance blurb on the game:
 
It's August 24th 1914, and the BEF is in full retreat -- in spite of them giving the Boche a bloody nose along the Mons canal. British General A.E.W. Gleichen's 15th Brigade (with De Lisle's 2nd Cavalry Brigade, in support) is desperately holding the left of Smith-Dorrien's II Corps. Should they cave in, the entire BEF will be enveloped by von Armin's IV. Armee-Korps. Smith-Dorrien has tasked 15th Brigade to cover his retreat. "Kindly lay down your lives", says he. But I say, must they, really?
 
So, with Joseph running the BEF, Colin (as 8th Div. commander, General der Infanterie Ernst II. Herzog von Sachsen-Altenburg) and Denis (as 7th Div. commander General der Infanterie Julius von Gross Genant Schwarzhoff) doggedly threw their battalions forward.
 
In a nutshell: Joseph gambled on placing all of his forces on his right, which is exactly were both German divisions attacked. Had the Germans attacked the British left it would have been a walk-over, but instead the game resulted in a typical 1914 bloodbath. The Germans units were savaged, but still managed to hold on to their forward positions. They initially had trouble bringing their considerable artillery to bear, but eventually began ranging-in, and the BEF showed signs of cracking towards the end of the game. Never-the-less, Smith-Dorrien managed to escape.
 
Notable incidents included the death of von Schwarzhoff, who was killed by the first (misdirected) shot of the game -- much to the great glee of Joseph --and a successful cavalry charge by the 4th (Royal Irish) Dragoon Guards against a mounted(!) bicycle unit of German Jaegers (not sporting, that). 
 
My thanks to all who played.
 
Colin's 8th Division, advancing on concealed British positions (flags)
 

Denis moves up his 7th Division


Units of the BEF's XXVIII Bde. RFA, lie in wait.
 
4.Thüringisches Infanterie-Regiment Nr. 72, backed-up by Mansfelder Feldartillerie-Regiment Nr. 75.
 

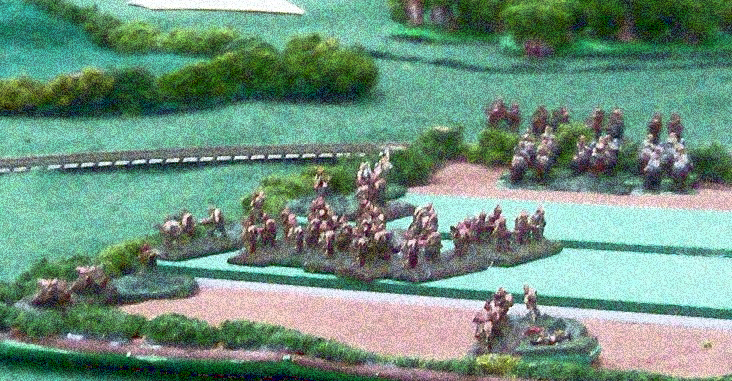
Anhaltisches Infanterie-Regiment Nr. 93 and Dragoner-Regiment Nr.7 move up on the left
 

The Irish Dragoon Guards spy a unit of bicycle mounted Jaegers conducting a recon, and...
 

"Ha! Ha! Got ya, then!" They charge to glory, and to Joseph's immense delight.
 
It's not all one-sided: The 1st East Surreys are being annihilated by German artillery, machinegun, and rifle fire at 'The Mine of Death'. The white cross is a spotting round marker for much German hate. The 1st Bedfordshires, out-of-frame on their right, and have been shot-up and are falling back. L Battery RHA, has been destroyed.


Another rare shot of advancing German Infantry (what do you do when you've got a lousy picture? Photo-shop it, of course!).
 
The rules we used were a variant of Osprey's The Men Who Would Be Kings, cheekily called The Men Who Would Be Fodder. The original required little modification; the biggest change being the inclusion of a spotting chart and rules for Indirect Fire.
 
The game itself was based on an article appearing in Wargames Illustrated #322, which featured a game by Worcester Wargames Club. Cheers!


Saturday 17 June 2017

Zulu Wars in 28mm

Just to show that I'm not hopelessly restricted to 2mm & 6mm, here is a shot of some of my fairly extensive 28mm Zulu War collection. Click to enlarge, SVP.


The scene, Peitermaritzburg. Hoping to inspire a company of the Natal Native Contingent, Lt. Vereker takes up a shield and leads them forth on parade. The 'powers that be' are not impressed. "Good God, Durnford!" says my Lord Chelmsford. "That officer of yours has gone positively native! Where the Devil does he think he is? Ireland?"

Sunday 11 June 2017

Marlborough's Wars with The Pikeman's Lament, Part II: Archie's Lament

This is a continuation of the previous posting:


The Battle

Having brought his force to the van of Marlborough's army, friend Archibald Cunningham is now tasked with taking and holding a vital crossroads. Can he do this before the French beat him to it?


The scene of battle, showing the crossroads town of Elixham.


The golden light of dawn on an early morning Flemish landscape (van Ruisdael would love it).


On the left, the Dutch and Imperialists move up... and spy French columns in the distance. 


There they are: the French right, consisting of a mixed force of Bavarians and French (oh, and O'Doul's Wild Geese, too).


The French left, moving up splendidly on Elixham.


Time for Archie's lads to deploy. That's our Hero himself, leading the Dragoons in the centre. Cunningham's Own Company of Heroes are on his left, Converged Grenadiers to his front. "I say,"  asks an officer of Grenadiers, "are those the Fwench just over there?".  


"Good God!" he answers his own question. "Fwench Twotters!" The Grenadiers have rolled snake-eyes on their activation roll and have inexplicably routed to the rear, colliding with their own Dragoons en route. The French haven't moved a muscle! It's up to Archie to rally them: "Get back in the ranks, you mutinous swine!" bawls he, pistoling a few, and thus concentrating their attention.


Meanwhile, the Dutch and French begin to come to grips on the left.


A bird's eye view of the field as the sides start to engage: French on the left, Allied on the right.


French and Dutch companies blast away at each other, while Imperial and Dutch support moves up.


It's all happening now: Dutch and Bavarians giving each other Hot Hell...


... and the Bavarians break. Good use of 'First Volley' is highly important in the rules. Shoot too soon, and you've thrown your 'First Volley' away. But if you time it right, and wait to see the 'whites of their eyes', you can quickly cripple your opponent.


To whit: now the Dutch have been sent reeling by the first volley of the supporting French company.


The Dutch commanding Officer is sent packing by a French volley


Montrose's Highlanders occupy Elixham. "We'el aw gang intae yon bonny wee toon (mind the Kirk, 'tho)."


But when they try to deploy in order to charge a nearby French company, they, too, are blasted away by its first volley.


Things are looking pretty bleak for Archie's command. The Converged Grenadiers move up, hoping that the French Dragoons facing them will fail their charge activation, and thus give them the chance to go into 'Close Order'. No such luck; the Dragoons charge before they can form, and they're sent scattering.


The mandatory follow-on charge by the French smashes them into Archie's own Dragoons, and he, too has to make an inglorious run for it.

Battle over! Loses are four-to-one in favour of the French!

So how did it play? Pretty well, but things tended to move very fast in the game. For example, there were four units of field guns, but only one had the chance to actually unlimber and get into the action. The others were left bringing up the rear, failing their activation rolls as they went.

Also: you need to be careful which unit (Horse or Foot) you assign your Officer to. If Horse, you get to lead from front but risk getting taken out early... and your entire command with you. Three of the four Officers in the game were leading Dragoon units, and all were routed. The fourth led an infantry unit, and got to steadily control things from the rear.

As I mentioned in the earlier post: the 6mm scale is a prefect one-to-one figure-to-man fit for the notional scale of the rules, but even through they work just fine (with a few adjustments), I think that 28mm probably 'feels' better. Osprey's Honours of War most likely has a better feel in 6mm

And as for Archie? Disgrace in this action left him packing his things for an extended stay the Highlands, and a future meeting with Rob Roy.


Saturday 29 April 2017

Marlborough's Wars using 'The Pikeman's Lament'

Like most of the 'Horse & Musket' gamers at my club (Trumpeter's Gaming Society) I, too, have been bitten by the Lion Rampant bug and its various iterations.

I wasn't going to purchase Daniel Mersey's The Pikeman's Lament initially, since I don't have any appropriate figures in my collection to game with (apart from my 2mm nano-scale ECW collection, which are based for DBA/M and really wouldn't work).

I was, however, instantly seduced by the rules, and they're pretty cheap... so what the heck? Maybe there'll be some useful ideas in there, I thought.

After a good look at the rules, however, and having run through my collections in my mind, it occurred to me that it would be pretty simple -- with a few minor modifications -- to game Marlborough's Wars using my 6mm War of the Spanish Succession collection. In fact, it's extensive enough to provide units for a big 64 point per side fight!

So what follows is an example of using the Osprey rule set to re-fight actions from The War of the Spanish Succession (early 18th century).

Modifications

I had to make two main modifications: 1) Cutting some troop types to suit the early 1700s, and 2) changes in scale for my 6mm collection.  I'll deal with the scale issue first.


Scale

The rules are written for 28mm figures, using inches for the ground scale. They do allow for smaller figure scales, and suggest using centimetres for 15mm and under. I've found that in cases like this, however, it's better to deal in 'half-inches' rather than centimetres, as this gives a bit more 'elbow room' when maneuvering on the table. To do this I made a custom half-scale ruler (the back & white rod in the picture below) marked off in three, four, five & six inch lengths. These are actually read as six, eight, ten & twelve inch lengths when playing. That way, there is no need to convert the tables or engage in clumsy 'halving' in the middle of a game; just read the tables as written, and let the custom ruler do the work.

The 28mm figures in the picture below represent a 12 fig. unit of Shot. As you can see, when formed up in a line they occupy a frontage of 12 inches. Since the scale is halved, the trick is to have the 6mm unit occupy a 6 inch frontage when deployed in the same formation. As long is the frontage being represented is about the same when adjusted for scale, all will be well.

My 6mm unit of Shot occupies a frontage of 5 1/4 inches (close enough), and is composed of six stands. In order to stay internally consistent with the rules these must represent 12 stands/figs., and so I count each stand double, and use a 'dead guy' stand as a marker when necessary to note the odd hit.


I did consider simply using 12 stands of 6mm to represent units of Shot, but decided against that, since 1) the units in my collection aren't painted up in such a way as to accommodate that -- it just wouldn't look right, and 2) it would cut the number of units that I could field, and take away from the 'big battle' feel that I like.


Six stand 6mm unit of Shot. The pikes in the command stands are just decoration, and are used to give the unit a late-17th/early-18th century feel. One benefit of this scale is that this unit consists of 72 figures, providing a perfect 'one figure equals one man' representation of a slightly understrength company of Foot.


Troop Types

I had to cut a few troop types to suit the early 1700s. Units of Pikes are gone, as are Clubmen. Units of plug or socket bayonet-armed Shot are able to form Close Order (as per the rules). Independent units of grenadiers are Forlorn Hope; skirmishers are Commanded Shot. Larger units of converged grenadiers are simply improved units of Shot. I also allow Battalion and Field Guns to be mobile, needing an activation roll to limber/unlimber.


Officer


In order to keep things simple I'm only using one Officer in this scenario (all other Officers will be 'generic'): Ensign Archibald "Archie" Cunningham, unacknowledged bastard son of the 4th Marquess of Montrose (from the film Rob Roy). Since Rob Roy is set in 1713 I'm following Archie's earlier military career on the continent.

Here's Archie's ratings. I didn't roll for these -- just chose them to fit his character:
  • Starting Rank: Ensign
  • Honour: 10 (well, that's what he starts with, anyway!)
  • Background: Sly (may refuse challenges with no morale test)
  • Initial Trait: Fencing Master (hits on a 4-6 in challenges)

Archie will command 'Cunningham's Company' (more like a small ad hoc battalion of about 400 men).

Cunningham's Company (26 pts)

  • Cunningham's Own Heroes (Unit of Shot). As per the rules I'm allowing all Shot units, which are bayonet armed, to form Close Order.
  • Converged Grenadiers (Unit of Shot) As above, but with improved Shoot value.
  • Montrose's Highlanders (Clan Unit) I decided to use a Clan unit for these, but I'm giving them conventional Shoot factors.
  • Highland Dragoons (Gallopers)
  • Montrose's Light Dragoons (Trotters)
  • Field Gun (limbered)

Dutch Allies (26 pts)

Archie's command will be reinforced by a 'company' of allied Dutch troops, consisting of:
  • One Dutch Officer
  • Two Regular units of Shot (as per above)
  • One unit of Grenadiers (as per above)
  • One unit of Dragoons (Gallopers, as per above)
  • One unit of Light Dragoons (Trotters, as per above)
  • Field Gun (limbered)

Scenario

I'll use the initial 'Ga Pa!' scenario provided in the rulebook, which involves two enemy forces going at each other. The background for this is taken from a 'Passage of the Lines of Brabant' (1705) game that I ran some time ago (this was a larger scale battle using the Black Powder rules). 

Archie's command forms the vanguard of Marlborough's army, and is ordered forward to seize a vital crossroad. He runs into some French bent on preventing him from doing same.


There are two 'companies' of French opposing Archie:


French Forces


Left Company (26 pts)

  • One French Officer
  • Three French Regular Units of Shot (as per above)
  • One unit of Dragoons (Gallopers, as per above)
  • One unit of Light Dragoons (Trotters, as per above)
  • Field Gun (limbered)


Right Company (26 pts)

  • One Bavarian Officer
  • One French Regular Unit of Shot (as per above)
  • One Converged Unit of Regular Bavarians & O'Doul's Wild Geese (as per above)
  • One Converged Unit of Bavarian Grenadiers (as per above)
  • One unit of Bavarian Dragoons (Gallopers, as per above)
  • One unit of Bavarian Light Dragoons (Trotters, as per above)
  • Field Gun (limbered)

Next time: Part II, the battle as it unfolded.

Saturday 15 April 2017

The Gaul's Games at Salute 2017

Below are some photos of the two games I ran at this year's Trumpeter's Gaming Society convention, Salute 2017. Detailed specifics of the games are in previous postings.

Dollard's Last Stand: The Battle of Long Sault, 1660
(Friday)

This one, with five players and myself as gamesmaster, can be broken down into three parts:
1) The French are caught in the open and run for the fort, 2) Dollard and company defend against numerous assaults on the walls -- with the Iroquois dying in droves -- until they are overrun, and
3) The Carignan-Salieres regulars arrive almost in the nick of time -- but too late save Dollard, and have to content themselves with blasting away the remains of the Iroquois (who outnumbered the French, militia and regulars combined, three-to-one)!

Rules were Mersey's The Men Who Would Be Kings (Osprey), using the half-sized unit option. Figures are Warlord Games.


The magnificent Fort Descheneaux, Gibraltar of the Ottawa River valley.  The heads? Oh, yeah, well, here's the thing about the heads... fact is, Dollard always seemed to have a lot in common with Mr. Kurtz.


Dollard and his boys make a run for the open gate held by Huron allies.  It takes an activation roll to close!


Dollard et. al. hold out in the stockade, despite desperate Iroquois assaults and intrusions. 

"By the Holy Spirit of the Chalice and the Tabernacle!" says Dollard. "Those treacherous Iroquois have snuck round the back and come over the wall!"


Desperate times as a pistol-packing Dollard single-handedly takes on a wild bunch.

 
Relief seems to be at hand as a company of the Regt. Carignan-Salieres arrive just in time.


It's all happening now: French regulars on the left, hoards of Iroquois pouring over the walls on the right, and our Hero can just be seen alone in the middle.


 Those cheating French have brought along a field gun, manned by a little known colonial unit: Les Bombardiers du Roi de Nouvelle-France.


But too late... Dollard, his lieutenant, and the resident Jesuit have been invited to a barbeque.
 
Thanks to all who played!
 
 
"Your Marshal is Seeing Double!": The Jena-Auerstadt Campaign, October 14th 1806 (Sunday)
 
Greg (Napoleon), Chris (Davout), Mike (Hohenlohe-Ingelfingen) were kind enough to volunteer for this nano-scale (2mm) game.  I helped out with the Prussians in the role of Brunswick, but took orders from Mike. Rules (The Limits of Glory) were homebrew. Figures are Irregular Miniatures.
 
The game pretty much followed the historic course of action, except that Brunswick retreated from the French at Jena, falling back on the River Ilm to support his fellow Prussians at Auerstadt.
 
I couldn't outrun Napoleon, however, and turned to fight him on the Ilm -- and was soundly thrashed for my trouble.
 
Davout's (Chris's) III Corps and Murat's cavalry were bled white at Auerstadt, but with I Corps on hand and the Imperial Guard rushing to support him, he managed to hold the line. Thus, the day went to the French.
 

View from the south-east: The Guard rush to support Davout.
 
General view of the field from the east. River Saale on the left, the river Ilm on the right. Jena is in the top left corner, some 12 miles distant.
 
 
 View from the north-east: Prussians columns cross the Ilm.
 
 Prussian columns on the march...
 
 
 ...with the French in hot pursuit.
 
 The battle of Auerstadt as seen from north. Chris's French on the left, Mike's Prussians on the right.
 
 
 Brunswick (left) turns to face Napoleon's concentrating corps.
 
 
A general view of the action from the north: the action at Auerstadt is in the bottom left corner, Prussian columns in the bottom right, and French columns dispersed at the top.
 
More than once players said, "What corps is that? Are they French?", which might have been frustrating but seemed all-together realistic!
 
Thanks to those who took part.